Today's the day when my latest stencil designs becomes officially available for purchase from StencilGirl Products. In this post, I'm showing you a few samples of what can be done with these new designs, plus a mini-tutorial for one of them which can be done in celebration of the Fourth of July here in USA. Let me start with the first one, City Buildings (L443):
After having done several urban sketches in New York City, I was inspired to come up with a stencil where anyone can use to create their own "urban sketch". For the background, I used paint markers with wide nibs and for the city buildings, I used black gesso. If you want the stencil to look more like hand drawn as shown below, you can used white gesso over the background and draw over the white gesso with paint markers:
Or you can use different colors on the dark background as shown below:
The above photos shows a few possibilities. Let's move on to the next stencil which gives you the option to modify the "landscapes" to suit your taste. It's Rural City Mountain Scape (L445) - the cityline's at the top, the farmland's in the middle, and the mountains' at the bottom. I'm showing you two examples that you can create from one stencil (the top and bottom can be used as masks):
The above art work was created with pastel in the pans. It reminds me of the farmlands with New York City as the background. The next one below shows the farmland with the mountains:
The above artwork was done with craft acrylic paint and cosmetic wedges. I have flipped the stencil over so that the barn is on the left instead on the right. You can create your own scenes with this stencil!
The next and last new stencil is Rural Buildings (L444). I've created three samples plus one tutorial:
For the sample above, I used craft acrylic paints in various colors on mixed media paper. The next one below was done with light blue pastel in a pan, and then with the stencil flipped over, dark blue acrylic paint was applied as shown below.
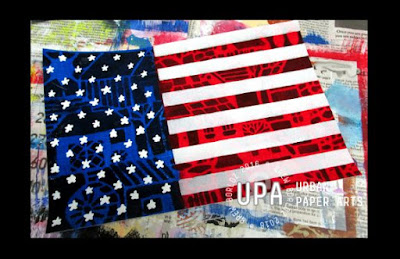
The next one shows how I used the above stencil as a "background" for a "flag".
Here's a tutorial which shows how the above work can be created:
I painted about 1/3 of the mixed media with medium blue paint and the rest with red paint. I put the stencil over the painted paper.
I mixed both colors with black gesso to make them darker and apply them with cosmetic wedges.
This is how it looks after the darker colors are applied:
I then cut two stencils myself - one with dots for placement of stars (done with Japanese punch) and one for strips. I used white index paper for these temporary stencils.
I started with the strips first by placing it down on the red part, and pounced it down with white gesso and cosmetic wedges.
After the strips are dry, I placed the other stencil and lightly stenciled the dots on the blue part - just enough for me to see the dots.
After the dots are dry, I drew the stars with white highlighter.
I've drawn the stars on all of the dots. After the stars are dry, the next step is trimming it down.
Here's the completed work and I hope you have enjoyed reading this post. I also hope that it has inspired you to think of other ways that my stencils can be used!
May your summer be a GREAT and a creative one!
*Full disclosure: Andrew Borloz does receive compensation for his
stencil designs from Stencil Girl Products in the form of royalties,
however, he does not receive any form of compensation or "free" product
from other designers, manufacturers or retailers.


2 comments:
Awesome new tools Andrew! Bravo!
Thanks so much, Michelle!
Post a Comment