Welcome! All words and images here are for your visual enjoyment, but please, even though it's only for your personal use, ask me first for permission to alter, copy or re-publish any words, images, artwork, photos or web design elements from this blog as they are Andrew Borloz' property, duly protected by international and US copyright laws. Thank you so much for respecting my property ownership.


30 September 2017

Art Postcards Created for Artists For Artists 2017

My friend Michelle Ward invited me to participate in her fundraising effort to assist artists affected by natural disaster. She asked me if I could create a postcard size artwork so that it can be part of a set of eight postcards. It was after Hurricane Harvey hit Texas when she sent me an invitation, and I came up with the first postcard below:


I used one of Michelle Ward's stencils (plus set mini stencil - click here and scroll down) for the above postcard. But when another hurricane hit Florida and an earthquake hit Mexico, I thought that maybe it would be better if I should create another art postcard in case the fundraising effort includes other areas. It did turn out that Michelle has decided to expand the scope to other areas affected by natural disasters. She asked me if I would do another one, and I happily obliged as I was in agreement with her enlarged scope. So I've come up another one below.


I decided to use one of my crazy quilt stencils as it reflects the diversity and unity of one group of artists in their efforts to raise funds for their fellow artists. You can see how I created the above postcard (sans the stitches around each pattern) - I've written a guest blog post and created a "silent" tutorial - click here.

Michelle coordinated all of the tasks involved in the creation and printing of the postcards - inviting the artists, processing their digital submissions (or digitizing their original art work), ordering, packing, posting in her Etsy shop, and fulfilling the orders. She has created the graphics for the group so that each artist could assist her fundraising efforts by promoting in his/her blog, IG, or FB page. Here's one of them: 

http://michelleward.typepad.com/michelleward/2017/09/artists-for-artists-fundraiser.html

She has written a blog post about the whole fundraising effort (here or above photo) and you can purchase a set of eight postcards in her Etsy shop, GRNPEP. Please bear in mind that this is limited edition and once sold, they will no longer be available for sale again. In her blog post, she has explained where all of the proceeds will go to - an organization serving the artists in need.

I think this is wonderful as it gave me an opportunity to help out my fellow artists affected by natural disasters.

01 September 2017

A Tour of My Memory Palace

At the beginning of this year 2017, Michelle Ward invited me to write an article about my wooden castle project for her regular article in Somerset Studio magazine's department, "Make It Your Own". In this post, I'd like to show you more details on how I was inspired to create my own designs for the castle.  Before I saw Michelle's Facebook post about the wooden castle two years ago, I was a member of The Documented Life Project (TM) 2014 group where the members were given a weekly prompt to create artwork. One of the weekly prompts involved creating an artwork as inspired by a famous artist. I selected Paul Klee's painting, Castle and Sun as the source of inspiration in my "recreation" of the same painting but with my own style (heavier white lines & more loose lines). Shown below is the original painting on the left and my own interpretation of his painting. 
 
After I saw Michelle's photo of the wooden castle, I went to Michael's to purchase one. I had to look for the one without defects as I had to return it twice for replacement. I had it in storage for quite a while as I was not sure what to do with the exterior surfaces. After browsing the humongous coffee table book on Alexander Girard's work, I came across two castle like buildings - one of them is shown below and the next one is in the subsequent photo with the pencil drawings.
  
Starting with the exteriors, I did pencil drawings for the surface decorations similar to one of Girard's castle illustrations.


After looking at the initial drawings, I decided that I would add the roofs to the tops to make it more like a chateau than a castle. I also decided that I would convert the drawbridge into a door, and added the front steps with balsa wood. More than a year ago, I showed the outside to Michelle Ward, and she was very impressed by it. She invited me to share the photos and write about it for her regular Make It Your Own article. The interiors were done three months ago - I was struggling to figure out what to do with each room. I had collected various items and stuff for the purpose of storing them inside the rooms.

I had a pile of stencil samples that I created for Stencil Girl Products - I reused them as "tiles" for the floors. Stencils that I used for these floors are available for purchase from Stencil Girl Products - click on it to view my stencil collections.  I completed the interiors on time for publication before I left for the trip to Chicago for International Urban Sketchers Symposium. I learned from a website about a retrospective exhibition on Alexander Girard's work at Cranbrook Art Museum in Deerfield Michigan. I decided that I would make a detour to this museum on the way to Indiana to stay at my friend's house while commuting to Chicago for the urban sketching workshops & events.
 It was well worth a detour for me. I had noticed that Alexander had used a lot of triangles in his work - graphic logos and textile designs.
 With a pleasant surprise, I noticed that Alexander created several miniature table settings, but I'm not planning to do the same for my castle as I had no intention of making it a "dollhouse".
 I was very happy to be able to see some of Alexander's collection of toy buildings and figures that represents daily life.
 In the same section where the toys were exhibited, I encountered a large three-paneled art work. The building in the middle looks very similar to the one that I used as a reference for my exterior surface design. I love the way several buildings were grouped together to form a "city" on both sides of the buildings. I'm inspired to perhaps create more buildings to be placed with the castle.
I'm so glad that I went there, and also am pleased with the exterior surfaces of my castle. The exteriors are done, however, the interiors are not done - they're still "work in progress" as they will be modified or renovated during the later years as long as more memories were either found or created.
Thank you for stopping and I hope you enjoyed the "tour" of my castle. (note: you can purchase the stencil used for that puppet who's waving goodbye!: Kunst Puppen)

UPDATE (Sept 10, 2017): You can read Michelle Ward's blog post about her design version of the wooden castle by clicking it HERE.

*Full disclosure: Andrew Borloz does receive one-time compensation for the write-up of his article published in Stampington & Company's September-October 2017 issue of Somerset Studio and for his own stencil designs in the form of royalties from Stencil Girl Products.

10 April 2017

Altered Composition Book

I have been busy lately with various projects such as stenciling, bookbinding, sorting & organizing art supplies, oil paintings, sketching, and taking on-line courses.

Today's Monday, and I was going to take a break from my own creativity, but as I was cleaning up and sorting out the art supplies, a few ideas popped up in my head. One of them involves using up the collage stash that have been sitting around waiting to be made useful.
The pile of paper is an accumulated samples produced for my stencil designs that I created for a stencil manufacturer. As I was picking out the papers, I had to just ignore either its color or pattern as I can be easily overwhelmed by the sheer variety. The next step is to figure out the size and cover for these pages, and since I have a pile of composition books that I bought at very good price.
I have used this book for documenting my ideas, and the pages can be too thin for water media. I had to use either quick dry media or pastel with fixative sprayed on. So, I decided that I would remove the pages by cutting the thread that bound them to the covers. 
Once I got the "neat" pages removed, I started folding the thick painted pages unevenly and collated them randomly. I then punched the holes so that pamphlet stitches could be sewn. 
I learned this method from three instructors in the classes that I took at three different art retreats. One recent trailer for an on-line course inspired me to do the same with the pages that I found during the clean-up (still on-going!). 
The next challenge is to make these pages work together. It will be a work in progress as I work in multiple projects and I have a book which is handy for documenting my creative process.
It fit nicely in a toolbox that I adapted for my art supplies this past weekend, and I will be transporting this box to wherever I will be working on various project.


07 March 2017

Book Cloth from Found Canvas


Several years ago, I was attending studio classes at one of an art school's two campuses, and there were several paintings piled up in one area that are free for the taking as they were going to be discarded if not taken. I saw two paintings and decided that I would reuse them. Both of them were covered with newspaper and painted over.
I didn't want to paint over the ugly images, so I spent three days removing the newspaper from the canvas. I completely uncovered what was underneath, and liked the colors so much that I decided that I would use the existing color palette.
I decided that I would use my own stencil designs (available from Stencil Girl Products) to "flatten" the image, and use the colors that either contrast or complement the existing ones. I added more colors with acrylic paint markers to make them look more like printed fabric patterns.

I then removed the canvas from the wooden frame, and cut two pieces from the upper right corner for the book covers.
I cut the binders board for the covers - I glued the cut canvas pieces to the boards and let them dry before attaching them to the text block that I bought from a book binding supply company. I spray them with glossy acrylic UV protection spray to make the colors pop out and to protect them from the UV.  Shown below is the completed book with front and back covers.
When I first started this project, my original intention was to create a whole new painting, but after altering the existing painting, I liked the colors and patterns so much that I decided to make book covers from them instead.

In the future, I hope to be able to offer on-line classes on how to create these patterns and also how to make the book cloth from the canvas.

*Full disclosure: Andrew Borloz does receive compensation in the form of royalties for his own stencil designs from Stencil Girl Products.

08 February 2017

Color Technique for Kunst Puppen Set B

 
Sometimes, using different colors for stenciling with the same image can be cumbersome if one has to use tapes or sticky notes as masks. But, I've come up with an alternative technique for coloring.

Using craft acrylic paint on one colored paper, I started with three different colors for one stencil:


I then cut them up horizontally using a metal ruler and an Exacto knife - be sure to use a new blade.


I then cut up them up vertically and sort them into three piles by color.


I then pick from each pile and prearrange them on a separate paper...


Using a fast-drying paper adhesive, I glue them down on paper strips - 4 inches wide.


After all of the body parts were glued down, I trimmed the edges.


This technique can be used very effectively with other puppets within two sets of "Kunst Puppen" that I designed for Stencil Girl Products. The above image is from the Kunst Puppen Set B.

I hope the above technique will make it easier for you to use different colors without having to use tapes or maskings. Also, I will show you more techniques for using my new Kunst Puppen stencils in my future blog posts.

*Full disclosure: Andrew Borloz does receive compensation in the form of royalties for his own stencil designs from Stencil Girl Products.


02 February 2017

Kunst Puppen: newest stencil design releases from Stencil Girl Products


While I was designing the masks stencils (Kunst Masken), I was also creating the puppet designs. The designs of both the masks and the puppets was inspired and influenced by the various styles from several European art movements and design philosophies such as Bauhaus, De Stijl, Dada and Cubism, which occurred during early 20th century (1910-1930).

I have seen marionettes and puppet shows many times - I often enjoyed them in spite of the fact I was not able to hear the spoken lines - the lips are so hard to read as they're so stiff!

I also have seen mime and sometimes puppet-like performances by Mummenschanz. When I was a kid, I even wrote a script, created a puppet theatre using cardboard boxes, designed the stage sets, and directed one hand puppet show. Yes, I did all that when I was a fifth grader.

I was very fascinated with the stage costume designs done by Oskar Schlemmer for a ballet performance at one of the Bauhaus schools. I was also intrigued with stage costumes designed by Fernand Leger for Ballets Suedois (The Swedish Ballet), and with the marionettes designed by Sophie Taeuber-Arp. All of these influences served as a basis for my new puppet stencils.


Set A (left) L480, Set B (right) L481 - both of these are large 9" x 12" stencils


Kunst Puppen One Male One Female S442, 6" x 6"
Kunst Puppen Set #1 (S442) - I designed this couple as if they were attending a formal gala. The female figure looks like as if she was dressed in Roaring 20's clothing, and the male figure looks like he's either going to a ball or is working in an office with bow-tie and suspenders.


Kunst Puppen  Two Females S443, 6" x 6"

These two figures - one "country" and one "urban" - were created so that they can be used interchangeably by using different heads, shoes, or torsos.


Kunst Puppen Two Males S444, 6" x 6"

Two "action" figures - one "medieval" wearing a beret and a "shield", and one "futuristic & robot-like" with an over inflated torso, arms & legs. They may look anachronistic together, but one can modify them to make it more like "time period correct".

These sets of puppets were designed so that they be used interchangeably with each other (within the same size), or used alone as "dolls" or "action figures". Or any one of these puppets can be used repeatedly to resemble a dance chorus line, a dueling match, or a couple attending a formal gala. One can create a whole new puppet using separate elements from each set described above.

You can order the above stencils through this link: Stencil Girl Products - Andrew Borloz.

*Full disclosure: Andrew Borloz does receive compensation in the form of royalties for his own stencil designs from Stencil Girl Products.

25 August 2016

Creative Process with Stencil Designs

I gave a short story of how I came up with the designs for StencilGirl Products in their blog post, Stencil Girl Talk. In addition to what I have already given in Stencil Girl Talk, I decided that I would give three more examples of how I came up with the designs. 
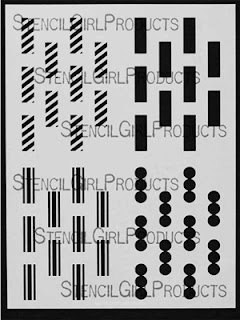
Here's my first example: one summer day a few years ago, I was looking at the lawn chair with webbing and decided to come up with a design that would allow the artists to create their own weavings or patterns.
 By looking at the pattern carefully, I created different linear patterns that would give multiple variations of the weaving.
http://www.stencilgirlproducts.com/product-p/l116.htm
The set of four designs above gives a lot of design possibilities. After I digitally created these designs from scratch, I was able to digitally stencil many different patterns - a few of which are shown below:
Shown below is one more sample stenciled with acrylic paints - it was stenciled first with black paint on top of a white box & later layered with paints in various colors:

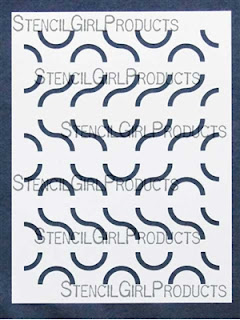
Another example (a second one) of my creative process involves using my childhood memories of playing games. One of my favorite games involves creating amoeba-like shapes based on the hidden cards in hand and plastic squares with raised quarter circles. Since I saw how different shapes can be created with one basic shape - an arc (quarter circle), I came up with the concept of using three different shapes: quarter rounds, half rounds, and squiggly lines (two quarter rounds combined).
Using these three basic shaped generated on my computer, I have created rows of different arrangements so that different patterns or shapes can be created:
http://www.stencilgirlproducts.com/product-p/l023.htm
From this one sheet alone, one can create an infinite array of different patterns. It also enabled me to create two other spinoffs (L021 and L022):
From one of the above two stencils, I've created a pattern on the corrugated cardboard for use as a frame:
One third and final example from my stencil design creation process is X & O. It was originally created from two sets made with thick glue gun lines. I was using it as a printing plate rather than as a stencil - hence the darkness of the glue. Before it was used, it was clear. 
I did use it as a stencil one time for spraypainting:
But for the purpose of make prints for stencil creation process, I made several more prints with black paint and took photos:
I then uploaded the photos and digitally combine the best ones together to create one stencil.
http://www.stencilgirlproducts.com/product-p/l108.htm
Although it does not create new patterns, but it does create more interesting visual effects when layered over top of other stencil designs that I've created. Here is one example where I layered the X & O stencil over the chevron stencil on top of gessoed corrugated cardboard.
I used the large stenciled cardboard for making two frames as shown below:
As you have seen, I used various techniques for creating new stencil designs: digitalized observations from ordinary objects, inspirations from puzzles or game boards, and glue gun. I hope I have either inspired you to create your own using my techniques or to create new patterns from my stencils.

You can purchase the above stencils from StencilGirl Products' website here.

*Full disclosure: Andrew Borloz does receive compensation in the form of royalties for his own stencil designs from Stencil Girl Products used in this project, however, he does not receive any form of compensation or "free" product used in these art work above from other designers, manufacturers or retailers.