Welcome! All words and images here are for your visual enjoyment, but please, even though it's only for your personal use, ask me first for permission to alter, copy or re-publish any words, images, artwork, photos or web design elements from this blog as they are Andrew Borloz' property, duly protected by international and US copyright laws. Thank you so much for respecting my property ownership.


25 August 2016

Creative Process with Stencil Designs

I gave a short story of how I came up with the designs for StencilGirl Products in their blog post, Stencil Girl Talk. In addition to what I have already given in Stencil Girl Talk, I decided that I would give three more examples of how I came up with the designs. 
Here's my first example: one summer day a few years ago, I was looking at the lawn chair with webbing and decided to come up with a design that would allow the artists to create their own weavings or patterns.
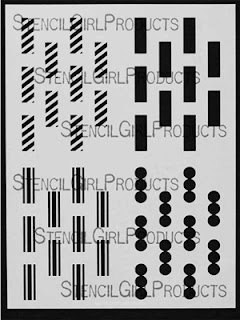
 By looking at the pattern carefully, I created different linear patterns that would give multiple variations of the weaving.
http://www.stencilgirlproducts.com/product-p/l116.htm
The set of four designs above gives a lot of design possibilities. After I digitally created these designs from scratch, I was able to digitally stencil many different patterns - a few of which are shown below:
Shown below is one more sample stenciled with acrylic paints - it was stenciled first with black paint on top of a white box & later layered with paints in various colors:

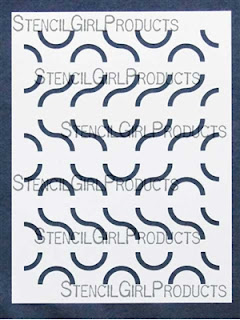
Another example (a second one) of my creative process involves using my childhood memories of playing games. One of my favorite games involves creating amoeba-like shapes based on the hidden cards in hand and plastic squares with raised quarter circles. Since I saw how different shapes can be created with one basic shape - an arc (quarter circle), I came up with the concept of using three different shapes: quarter rounds, half rounds, and squiggly lines (two quarter rounds combined).
Using these three basic shaped generated on my computer, I have created rows of different arrangements so that different patterns or shapes can be created:
http://www.stencilgirlproducts.com/product-p/l023.htm
From this one sheet alone, one can create an infinite array of different patterns. It also enabled me to create two other spinoffs (L021 and L022):
From one of the above two stencils, I've created a pattern on the corrugated cardboard for use as a frame:
One third and final example from my stencil design creation process is X & O. It was originally created from two sets made with thick glue gun lines. I was using it as a printing plate rather than as a stencil - hence the darkness of the glue. Before it was used, it was clear. 
I did use it as a stencil one time for spraypainting:
But for the purpose of make prints for stencil creation process, I made several more prints with black paint and took photos:
I then uploaded the photos and digitally combine the best ones together to create one stencil.
http://www.stencilgirlproducts.com/product-p/l108.htm
Although it does not create new patterns, but it does create more interesting visual effects when layered over top of other stencil designs that I've created. Here is one example where I layered the X & O stencil over the chevron stencil on top of gessoed corrugated cardboard.
I used the large stenciled cardboard for making two frames as shown below:
As you have seen, I used various techniques for creating new stencil designs: digitalized observations from ordinary objects, inspirations from puzzles or game boards, and glue gun. I hope I have either inspired you to create your own using my techniques or to create new patterns from my stencils.

You can purchase the above stencils from StencilGirl Products' website here.

*Full disclosure: Andrew Borloz does receive compensation in the form of royalties for his own stencil designs from Stencil Girl Products used in this project, however, he does not receive any form of compensation or "free" product used in these art work above from other designers, manufacturers or retailers. 


11 August 2016

New set of stencils - Kunst Masken


Ever since I learned about Bauhaus from the design history course that I took when I was an industrial design major, I've always loved its design style. I have looked though the books containing the works of the Bauhaus instructors, and also visited Museum of Modern Art in New York City for the special exhibitions of various instructors.

As inspired by the masks and ballet costumes designed and created at the Bauhaus schools, I have created a set of art masks - three 9x12s and three 4x4s.
I have used them for creating my own art postcards (5.5 inches x 8.5 inches) - they were formerly advertising postcards that came into the mailbox almost daily.


These above masks are easily customized with paint markers. I've used part of the overall pattern to create "strips" on the postcards as shown below.
I have used various techniques for creating different effects with the same stencils (9x12). The left side of the photo below were stenciled directly on the white mixed media paper, and the right side were done on the painted backgrounds.

You can purchase these stencils from StencilGirl Products' website here.

*Full disclosure: Andrew Borloz does receive compensation in the form of royalties for his own stencil designs from Stencil Girl Products used in this project, however, he does not receive any form of compensation or "free" product used in these art work above from other designers, manufacturers or retailers. 

07 July 2016

White-lining Technique for Stenciled Patterns

I just wanted to show you the "white-lining" technique that I used to create "tiling" or grout-like effect on my stenciled patterns. Before I white-line them with my white-out pen (white paint markers or white gel pens can be used instead), I stenciled the triangles with the first row of the designs on the Chevron stencil (L204) that I designed for Stencil Girl Products.  The focus of this post is on the white-lining technique, and another post will be written showing how I created different designs/images with the Chevron stencil (L204).

Starting with the first pattern (upper left of the above photo), I used a metal ruler with the cork backing to keep it off the surface while white-lining so that it won't "bleed" under the ruler. A wooden ruler with the metal edge can be used instead.
I kept on adding the lines until I got the effect I wanted. I noticed that the lines made the triangles a little more sharp, neat and precise. 

The next one is a little more complex. I drew the diagonal lines from left to right and then from right to left.
I stopped after two diagonal lines as I didn't want to make it look too "busy" with horizontal lines.
The next one is a bit more complicated - I created two different effects on the same page.

I created the above patterns for my collage stash/decorative paper collection for use in my future projects. I'm sure that some of you are interested in how I can create more designs with the same stencil (Chevron, L204) from Stencil Girl Products, so multiple tutorials will be developed in the near future as there are so many different possibilities from just one stencil.

*Full disclosure: Andrew Borloz does receive compensation in the form of royalties for his own stencil designs from Stencil Girl Products used in this project, however, he does not receive any form of compensation or "free" product from other designers, manufacturers or retailers.

24 June 2016

Binding the Art Postcards

Since May 27 of this year (2016), I have been "upcycling" the advertising postcards that came in the mail at my house. It was a lot more economical than buying cardstock and gave me greater freedom to experiment and make a lot more mistakes without worrying about my money being wasted. Also, I need to use up the craft acrylic paint that have been in storage for too long. When I first started this art postcard project, I didn't realize that I would be producing so many.
As I was enjoying the process of creating them, it became apparent to me that it is getting more difficult to handle loose postcards and keep them in chronological order. I thought up several ways these postcards could be bound or stored somehow until one day I remembered keeping several spent sketchbooks with the perforated pages torn out, hoping that some day I would re-purpose them.

I looked closely at the paper left in the sketchbook, and decided that I could attach the postcards to these strips of paper still in the sketchbook. I cut the 9 x 12 sketchbook in half with a pair of pliers and X-acto knife.
I then pried open the wire binder to take the covers and strips out so that I could glue the postcards to the strips one at a time. I then painted the strips and back of each postcard with black gesso.
The first one took me a while as I was trying to figure out how to make it work.
The second one was a breeze. I used a white wipe-out pen for the cover titles.
I've provided two videos showing the fifty postcards in two books for your viewing pleasure.
The first one shows a set of postcards - no. 001-025:
*Post publish notice (Jun 24 2015 5:10 pm): I've noticed the quality of the above and below videos were not good, so, here's the links to the better quality videos: Book One and Book Two.  
The next one shows second set of postcards - no. 026-050:
With the above videos, I hope I have inspired you to re-purpose the "junk postcards" or sketchbooks instead of throwing them away or sending them to recycling center. 

*Full disclosure: Andrew Borloz does receive compensation in the form of royalties for his own stencil designs from Stencil Girl Products used in this project, however, he does not receive any form of compensation or "free" product from other designers, manufacturers or retailers.
18 June 2016

Newest Stencils from StencilGirl Products

Today's the day when my latest stencil designs becomes officially available for purchase from StencilGirl Products. In this post, I'm showing you a few samples of what can be done with these new designs, plus a mini-tutorial for one of them which can be done in celebration of the Fourth of July here in USA. Let me start with the first one, City Buildings (L443):
After having done several urban sketches in New York City, I was inspired to come up with a stencil where anyone can use to create their own "urban sketch". For the background, I used paint markers with wide nibs and for the city buildings, I used black gesso. If you want the stencil to look more like hand drawn as shown below, you can used white gesso over the background and draw over the white gesso with paint markers:
Or you can use different colors on the dark background as shown below:
The above photos shows a few possibilities. Let's move on to the next stencil which gives you the option to modify the "landscapes" to suit your taste. It's Rural City Mountain Scape (L445) - the cityline's at the top, the farmland's in the middle, and the mountains' at the bottom. I'm showing you two examples that you can create from one stencil (the top and bottom can be used as masks):
The above art work was created with pastel in the pans. It reminds me of the farmlands with New York City as the background. The next one below shows the farmland with the mountains:
The above artwork was done with craft acrylic paint and cosmetic wedges. I have flipped the stencil over so that the barn is on the left instead on the right. You can create your own scenes with this stencil!
The next and last new stencil is Rural Buildings (L444). I've created three samples plus one tutorial:
For the sample above, I used craft acrylic paints in various colors on mixed media paper. The next one below was done with light blue pastel in a pan, and then with the stencil flipped over, dark blue acrylic paint was applied as shown below.
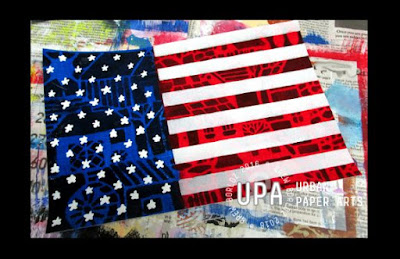
The next one shows how I used the above stencil as a "background" for a "flag".
Here's a tutorial which shows how the above work can be created:
I painted about 1/3 of the mixed media with medium blue paint and the rest with red paint. I put the stencil over the painted paper.
I mixed both colors with black gesso to make them darker and apply them with cosmetic wedges.
This is how it looks after the darker colors are applied:
I then cut two stencils myself - one with dots for placement of stars (done with Japanese punch) and one for strips. I used white index paper for these temporary stencils.
I started with the strips first by placing it down on the red part, and pounced it down with white gesso and cosmetic wedges. 
After the strips are dry, I placed the other stencil and lightly stenciled the dots on the blue part - just enough for me to see the dots.
After the dots are dry, I drew the stars with white highlighter.
I've drawn the stars on all of the dots. After the stars are dry, the next step is trimming it down.
Here's the completed work and I hope you have enjoyed reading this post. I also hope that it has inspired you to think of other ways that my stencils can be used!
May your summer be a GREAT and a creative one!

*Full disclosure: Andrew Borloz does receive compensation for his stencil designs from Stencil Girl Products in the form of royalties, however, he does not receive any form of compensation or "free" product from other designers, manufacturers or retailers.